Varisett Staffing is available to order today at varisett.com/staffing. It's for agencies that supply temporary and shift workers to client businesses. It covers the whole week, from a worker's first document to the client's invoice:
- onboarding and clearing workers on their phones;
- filling shifts;
- checking clock-ins against the client's site;
- getting timesheets approved by the client;
- producing pay files and invoices on your own pay cycle.
Like every Varisett platform, each agency gets its own branded system on its own web address, with its own dedicated database. It's ordered online and set up automatically. This article covers what it does and how each job is done, section by section, so you can come back to the part you need.
Contents
- Who does what
- Getting set up
- Add a worker and onboard them
- Set up a client
- The client portal
- Fill a shift
- Clocking in and out
- Timesheets
- Make a pay run
- Invoice your clients
- Reports and staying on top
- What Varisett Staffing doesn't do
- Plans and ordering
Who does what
Everyone sees only what their job needs. An office user can hold more than one role.
| Who | Signs in with | Can |
|---|---|---|
| Director | Email and password | Everything, including branding, settings and the office team |
| Manager | Email and password | Runs the agency day to day: clients, workers, shifts, compliance, rates |
| Consultant | Email and password | Clients, contacts and sites; workers; shifts, offers and timesheets. Sees whether a worker is cleared, not their documents |
| Compliance | Email and password | Checks workers' documents and clears them to work |
| Finance | Email and password | Rates, timesheets, pay runs, invoices and reports |
| Worker | Worker ID and a PIN on their phone | Their own details, documents, availability, offers, shifts and hours |
| Client contact | A private link (and a PIN, if you turn it on) | Their own company's shifts, requests, timesheets, terms and invoices |
Getting set up
The Today page shows a "Getting set up" checklist until each step is done. The order that works best:
- 1BrandingBusiness settings: your name, logo and colour, used on every page your office, workers and clients see.
- 2Your words and rulesBusiness settings: what you call your workers, the clock-in distance and rule for new sites, night hours, weekly overtime, and the timesheet rules (below).
- 3Pay and invoicesSetup, Pay and invoice settings: VAT, invoice numbering, your bank details, holiday pay method, and your pay cycle.
- 4Job rolesSetup, Job roles: the kinds of work you place people in, e.g. Warehouse operative, Security officer.
- 5DocumentsSetup, Document types: which documents workers must hand in and whether they expire. Sensible ones come set up.
- 6TermsSetup: publish your terms for workers and your terms for clients. Each change is a new version, and everyone accepts the current one.
- 7Umbrella companiesSetup, Umbrella companies: the ones your workers may be paid through, with your checks on each.
- 8Your teamSetup, Team logins: invite your office staff and give each their role.
Your pay cycle can be weekly, fortnightly, every four weeks or monthly. It can start on any day, and a monthly cycle can end on any date from the 1st to the 28th. Set how many days after a period ends people are paid, and every pay run shows its pay date.
Timesheet rules are optional, all in Business settings:
- rounding clock times to 5, 6, 10, 15 or 30 minutes, in the worker's favour or to the nearest (never below the minimum wage);
- unpaid breaks worked out from the length of the shift;
- how late a clock-in can be before it counts as late;
- a deadline for clients to approve timesheets;
- whether workers see pay rates;
- whether clients need a PIN to act in their portal.
Add a worker and onboard them
- 1Add themWorkers, Add a worker: their name and phone. They get a Worker ID, e.g. W0101.
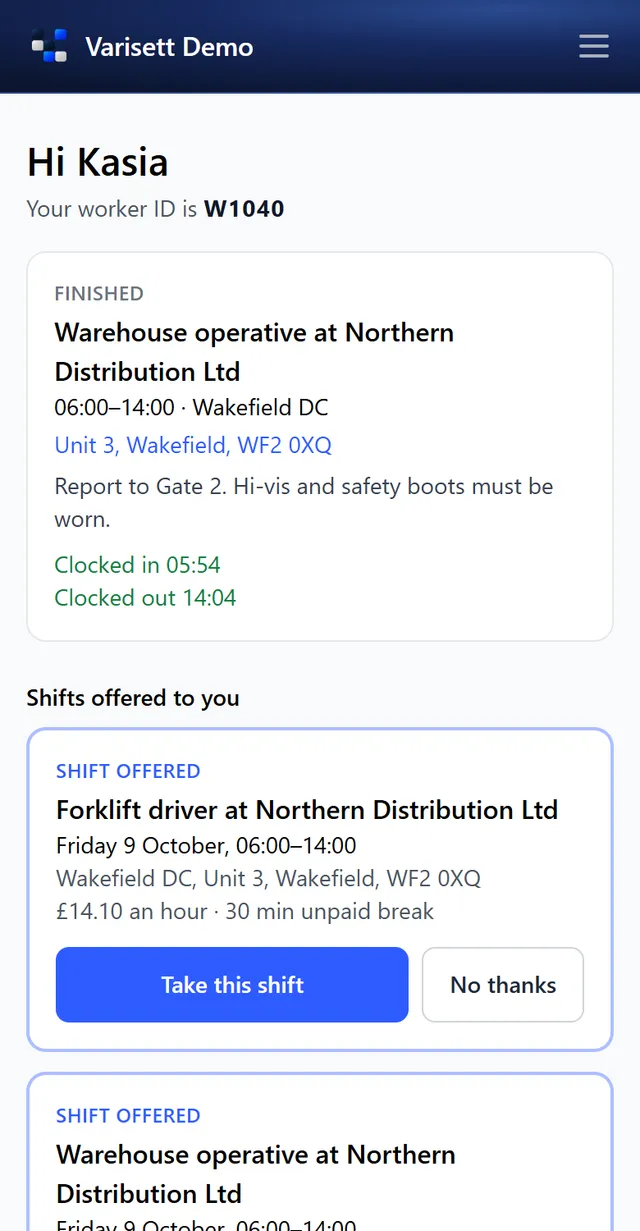
- 2Send their linkOn their page, Make a sign-in link, then Copy link or Text it. The link works once, for 14 days.
- 3They choose a PINThey open the link on their phone and choose a 6-number PIN. From then on they sign in with their ID and PIN.
- 4They onboardIn the app: their details and emergency contact, their documents, how they're paid (through your payroll or an umbrella company), your terms, and when they can work. Then they send it in.
- 5You check documentsCompliance, or the worker's page: open each document, record how you checked it, approve it and add its expiry date.
- 6Make them ActiveOnce every required document is approved and in date, the page says "Cleared to work". Set their stage to Active and they can be offered shifts.
Other ways in. You can switch on a public "register with us" page in Business settings, so people sign up and start onboarding themselves. If a worker forgets their PIN, make them a new sign-in link and they choose a new PIN.
Set up a client
- 1Add the clientClients, Add a client: their details, how often you invoice them, and their payment terms. Their page has an onboarding checklist.
- 2Add sitesEach site's address. Find its map point from the postcode, then set how close workers must be to clock in, and whether clocking in from further away needs your OK or is only marked for review. A site can have a PO number for its shifts.
- 3Set ratesFor each job role: the pay rate and the charge rate, with optional night, weekend, overtime and bank holiday rates, and an umbrella rate. Rates start on a date, so next year's can be entered in advance. The page shows your margin and warns if pay is below the minimum wage.
- 4Choose their optionsA minimum number of paid hours a shift, and how their invoices are laid out: one per period, per site, per PO number or per pay week, with a line per worker, per job role or per shift.
- 5Add contactsWho you deal with, who approves timesheets and who gets invoices.
- 6Give them the portalOn a contact, Make a portal link, then copy or email it. Making a new link stops the old one.
The client portal
Each client contact gets their own private link. No account or password is needed. In the portal they can:
- see who's booked on their shifts and whether they've arrived;
- request shifts, which arrive in your Shifts as requests for you to confirm or decline;
- approve timesheets or query them with a note;
- read and sign your terms;
- see their invoices.
They only ever see their own company. Workers are shown by first name and surname initial; contact details, documents and pay rates are never shown.
The portal PIN. Turn this on in Business settings to make acting in the portal need a PIN. Approving or querying timesheets, requesting shifts and signing terms then need a 6-number PIN, which each contact chooses the first time; viewing still works from the link alone. Each device is remembered for 30 days. Five wrong PINs lock it for 15 minutes. You can reset a contact's PIN on the client's page, and a new link clears it.
Fill a shift
- 1Put up the shiftShifts, New shift: the client, site, job role, times, unpaid break, how many people, notes for the workers, and a PO number. Choose one date, or repeat it on weekdays for up to 4 weeks or every day for a week.
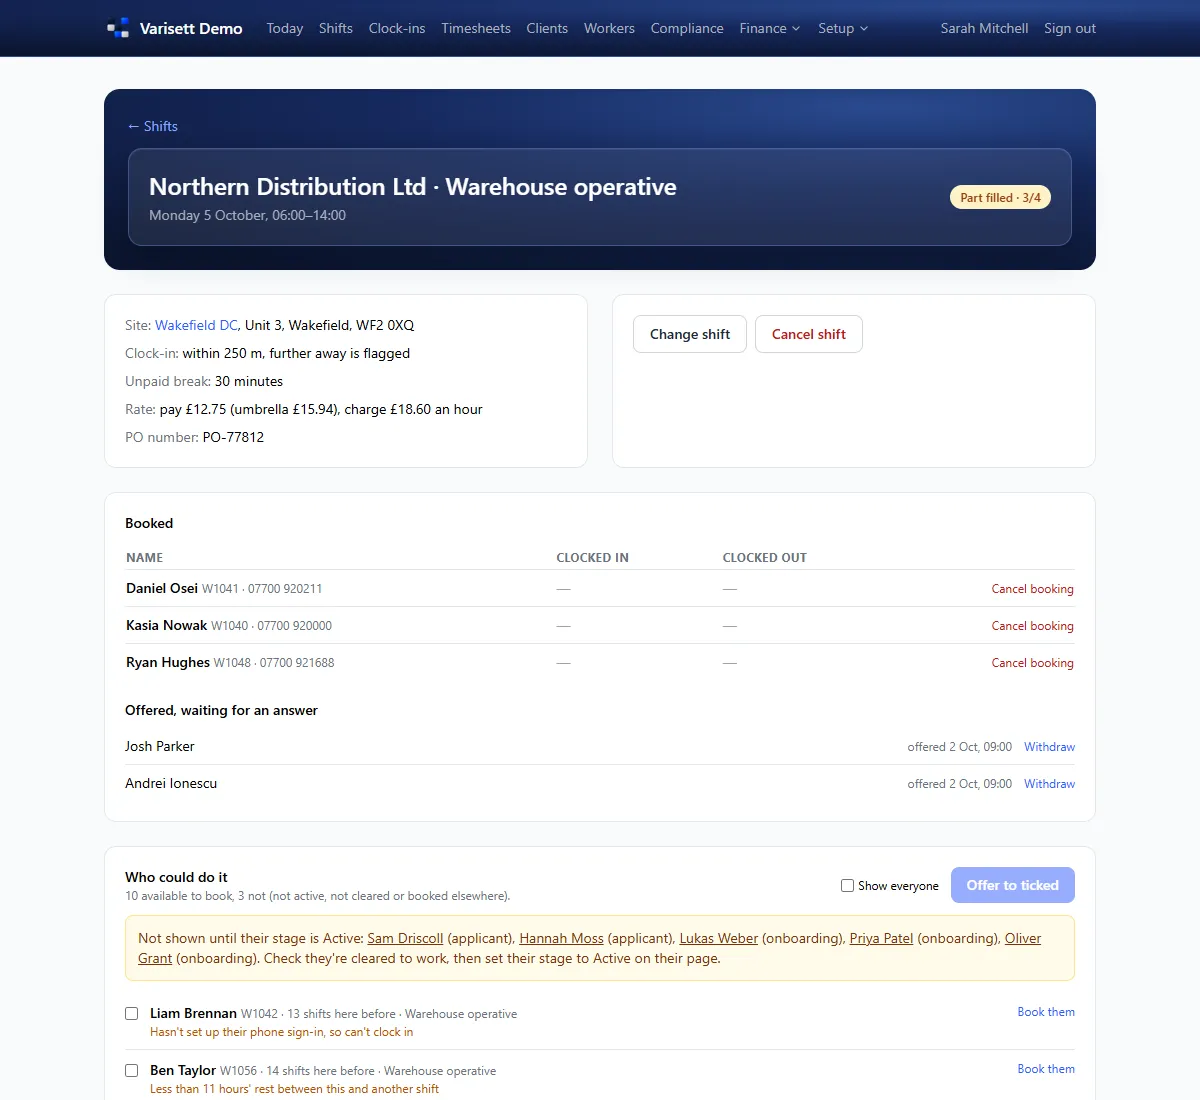
- 2See who could do itThe shift's page lists everyone who could do it, best first. People who can't be booked are blocked: not cleared on that date, or booked elsewhere at the time. Other things are shown as warnings for you to weigh up: the job role, availability, days off, rest between shifts, a long week, late clock-ins and times they didn't turn up.
- 3Offer itTick the people you'd like and choose Offer to ticked. They see the offer in their app, and the first to accept gets the place. If someone has already said yes on the phone, choose Book them instead.
- 4It's filledA shift is never overfilled, and nobody is double-booked; the system refuses both. When it's full, any offers still open are withdrawn.
The shift calendars show a day, a week or a month, coloured by how full each shift is. Requests from clients show in their own colour until you confirm them.
Clocking in and out
Workers clock in and out on their phone, from a few minutes before the shift starts. The server checks where they are against the client's site, and uses its own clock, not the phone's.
- On site: recorded as normal.
- Too far away, at a site set to need your OK: the worker gives a reason, and it waits on the Clock-ins page for you to OK or refuse.
- Too far away, at a site set to mark for review: allowed, and flagged.
Location is taken at those two moments only, never in between. A clock-in more than your grace period after the start is marked late. If someone doesn't turn up, mark "Didn't turn up" on the timesheet; it's counted on their record and shown as a warning next time you book them.
Timesheets
- 1Check the weekTimesheets shows your pay week: each booking, its clock-in and clock-out, the times being paid, and its status.
- 2Correct if neededChange a timesheet's start, finish or break, with a note saying why. Changing it un-approves it, so it's checked again.
- 3ApproveApprove each one, or every ready one at once, on the client's behalf. Or leave them for the client to approve in their portal, and you'll see who approved each one.
- 4Deal with queriesA client's query shows on the timesheet with their note. Correcting the times answers it.
With a client approval deadline set, clients see it in their portal. After it, the Timesheets page marks what's left and offers to approve it on their behalf. Once a timesheet is on an invoice or in a finalised pay run, it's locked.
Make a pay run
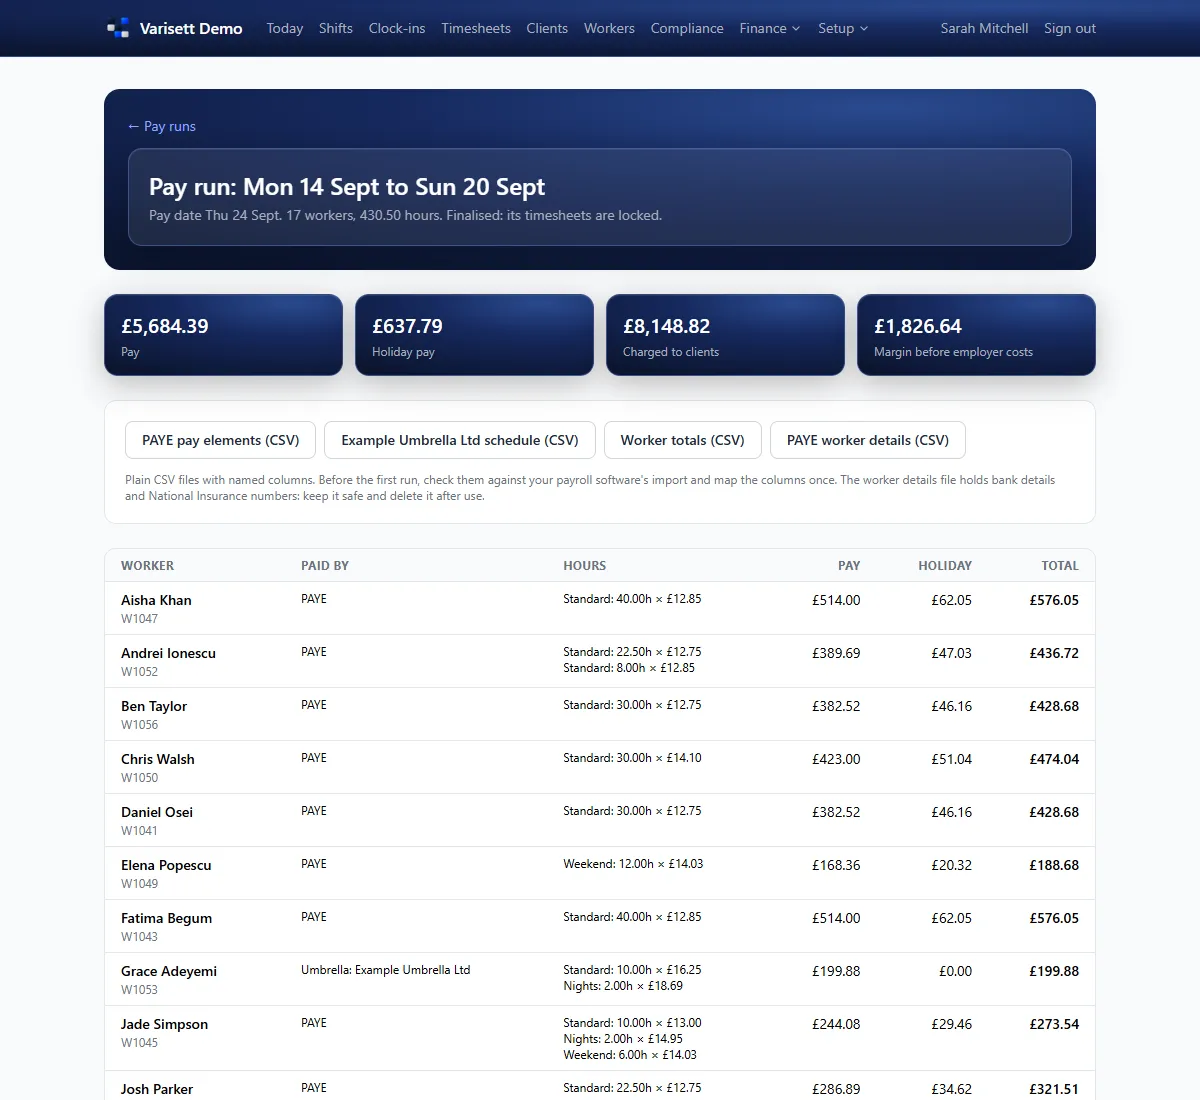
- 1Choose the periodFinance, Pay runs: pick one of your pay periods (it shows the pay date), or other dates.
- 2Read the warningsAnything to sort out first: a missing rate, missing bank details, pay below the minimum wage, timesheets not approved.
- 3Check the figuresEach worker's hours by kind (standard, nights, weekends, overtime, bank holidays), pay and holiday pay. Work it out again after any change.
- 4Download the pay filesSpreadsheet (CSV) files for your payroll software: PAYE pay elements, worker totals, PAYE worker details for setting people up, and one schedule per umbrella company.
- 5FinaliseFinalising locks the run and its timesheets.
The sums are done for you:
- Night, weekend and bank holiday rates are applied minute by minute. The highest applies when more than one does.
- Weekly overtime starts after your threshold, in your pay week.
- Holiday pay is either rolled up at 12.07% or left to accrue, as you choose.
- Workers paid through an umbrella company get the rate card's umbrella rate. The umbrella company pays them.
Invoice your clients
- 1Make the invoicesFinance, Invoices: choose the dates (they default to the last week, fortnight or month), and optionally only clients invoiced that often, or one client. Drafts are made from approved timesheets not already invoiced, in each client's own layout.
- 2Check and issueOpen each draft, add a PO number or notes, then issue it. It gets its number and date, and the client can see it in their portal.
- 3Get paidRecord payments as they come in; part payments are fine. Voiding an invoice frees its timesheets to be invoiced again.
VAT is added at your rate if you're VAT-registered. The Today page shows what's owed and what's overdue.
Reports and staying on top
The Today page shows the day at a glance:
- client requests to confirm;
- shifts today, and places still to fill this week;
- clock-ins waiting for an OK;
- timesheets to approve;
- people who've finished onboarding;
- documents to check or about to expire;
- what's owed.
The Outstanding tasks report lists every one of those as its own row, with who or what it's about and when, plus overdue invoices. Everyone in the office can see it.
Managers and finance also have these reports, each downloadable as a spreadsheet:
- margin by client;
- hours and pay by worker;
- holiday;
- a 12-week pay parity tracker, showing who's reaching 12 weeks in the same role with the same client;
- umbrella company checks.
What Varisett Staffing doesn't do
Guides for every role
Step-by-step guides for the director, consultants, compliance, finance, workers and clients are at varisett.com/help/staffing.
Plans and ordering
Priced by the number of people in your office. Workers and clients are unlimited on every plan, and every plan has every feature.
| Plan | Office users | Per month |
|---|---|---|
| Solo | Up to 3 | £129 |
| Team | Up to 10 | £349 |
| Business | Up to 25 | £749 |
| Scale | Up to 100 | £1,999 |
Every plan can be paid monthly, or annually with 2 months free. Order at varisett.com/staffing, and your system is set up automatically on your own address. Already a Varisett customer? Sign in and add Staffing to your business: it appears at the same address, with the same login.